
Learn how to slice bread without squishing for perfect, clean cuts every time. This guide covers the right tools, techniques, and tips to achieve beautiful bread slices, even for beginners.
Slicing a beautiful loaf of bread can feel surprisingly tricky, especially when you’re just starting out in the kitchen. That satisfying crunch of a crusty exterior giving way to a soft interior is a joy, but if your knife digs in too hard, you can end up with a squashed mess instead of neat slices. It’s a common frustration, but don’t worry! With a few simple techniques and the right approach, you’ll be slicing like a pro in no time.
In this guide, we’ll break down exactly how to get those perfect slices. We’ll talk about the best tools for the job, how to hold your knife and the bread securely, and the gentle sawing motion that makes all the difference. Get ready to build your confidence and enjoy your bread to the fullest!
Why Does Bread Get Squished? Understanding the Challenge
Bread is a wonderfully forgiving food, but it has its own personality! The very things that make it delicious – its airy interior and often crisp crust – can also make it challenging to slice cleanly. A soft, airy crumb can collapse under pressure, while a tough crust might resist a dull knife. The goal is to cut through both without crushing the delicate inside.
Many beginner cooks try to force the knife down, thinking more pressure equals a cleaner cut. This is the opposite of what’s needed! A gentle, steady sawing motion is key. We want to let the sharpness of the knife do the work, not brute force. By understanding how the bread’s structure reacts to different cutting styles, we can avoid that dreaded squish.
The Essential Tools for Perfect Slices
Having the right tools makes any kitchen task easier, and slicing bread is no exception. You don’t need a whole arsenal, just a couple of key items that will help you achieve those beautiful, even slices.
The Star Player: Your Knife
When it comes to slicing bread, a good knife is your best friend. While you can manage with a sharp chef’s knife in a pinch, one type of knife is specifically designed for this task:
- Serrated Bread Knife: This is the ultimate bread slicing tool. Its long, sharp, and saw-like teeth are designed to grip the crust and slice through it without tearing. The teeth then easily saw through the soft interior. Look for a knife with a blade that’s at least 8 inches long for good leverage and to accommodate larger loaves. A comfortable handle is also important for control.
The Supportive Cast: Other Handy Items
Beyond the knife, a few other things can help ensure a smooth slicing experience:
- Cutting Board: A sturdy, non-slip cutting board is crucial. It provides a stable surface for your bread and protects your countertops. Wooden or bamboo boards are great, but make sure they are large enough to hold your loaf comfortably.
- Damp Cloth or Paper Towel: Placing a damp cloth or paper towel under your cutting board can prevent it from sliding around, adding an extra layer of safety.
- Towel or Loaf Pan: If your bread is particularly soft or has a very delicate crust, you might gently place a clean kitchen towel over it or even slice it while it’s still in its loaf pan (if the pan allows for stable cutting). This offers a bit of support.
Step-by-Step: How to Slice Bread Without Squishing
Now that you have your tools ready, let’s walk through the simple steps to achieve those perfect, un-squished slices. Remember, patience and a gentle touch are your superpowers here!
-
Prepare Your Workspace: Place your cutting board on a stable, flat surface. If it tends to slide, tuck a damp paper towel or a thin kitchen towel underneath it. Make sure you have enough space to comfortably maneuver your knife and the bread.
-
Position the Bread: Place your loaf of bread onto the cutting board. For most loaves, slicing them horizontally (from end to end) is the best approach. If you’re slicing a round artisan loaf, you might prefer to slice it in half first, then cut half-moons or wedges from there. Ensure the loaf is stable and won’t roll or shift.
-
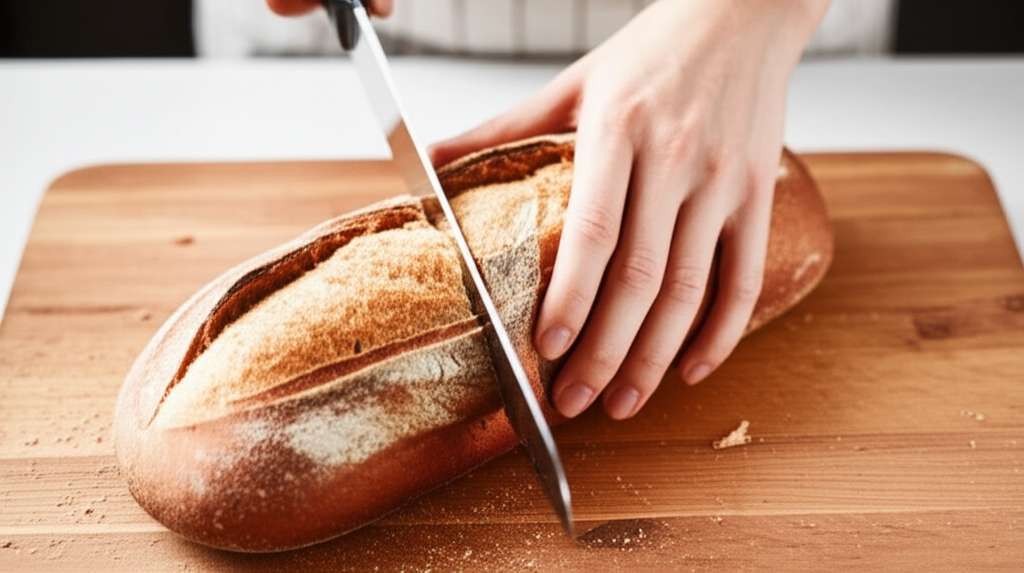
Secure Your Grip: This is where safety and precision meet. Place one hand gently on top of the bread, near the end you’ll start slicing from. Curl your fingertips slightly inward, creating a “claw” grip. This protects your fingers and provides gentle downward pressure to keep the bread stable. Avoid pressing down hard; just enough to keep it still.
-
Start the Cut: Position the tip of your serrated bread knife on the crust, where you want to begin your slice. Gently saw back and forth with a smooth, fluid motion. The goal is to let the serrated edge do the work. Don’t push down forcefully; instead, focus on a steady, rhythmic sawing action.
-
Continue Slicing: As the knife starts to cut into the bread, continue the sawing motion, moving the knife forward and back. Slowly guide the knife through the entire loaf. If you encounter a very hard crust, you might need to apply slightly more pressure, but always with a sawing motion, not a straight downward chop. As you reach the bottom, be mindful of your fingers on the cutting board.
-
Complete the Slice: Once you’ve cut all the way through the loaf, gently pull the knife out. You should have a clean, even slice of bread. Place the slice aside and repeat the process for subsequent slices, repositioning your guiding hand each time.
Common Beginner Mistakes & Quick Fixes
It’s completely normal to encounter a few hiccups when you’re learning! Here are some common issues and how to solve them:
- Mistake: Squishing the loaf with your guiding hand.
Fix: Gently curl your fingertips inward, like a cat’s paw, and rest them on top of the bread. This creates a protective barrier and uses your knuckles to guide the knife, rather than your soft fingertips.
- Mistake: Pushing the knife straight down.
Fix: Remember to saw! Use a back-and-forth motion. Let the sharp, serrated teeth do the cutting for you. Think of it like sawing through wood – a steady rhythm is more effective than brute force.
- Mistake: Using a dull knife.
Fix: This is a big one! A dull knife will tear and squish. Invest in a good serrated bread knife and keep it sharp. If your knife feels like it’s struggling, it’s time to sharpen or replace it.
- Mistake: Bread moving on the cutting board.
Fix: Ensure your cutting board is stable. Place a damp cloth or paper towel underneath it. For very soft breads, you can even try slicing them while they’re still in their loaf pan if the sides offer enough support.
Pro Tips for Effortless Bread Slicing
Want to take your bread slicing game to the next level? Here are a few extra tips from the kitchen:
- Let It Cool (Mostly!): Slicing bread when it’s piping hot can lead to a gummy interior. Let your freshly baked bread cool on a wire rack for at least 30-60 minutes. This allows the steam to escape and the crumb to set, making it firmer and easier to slice cleanly.
- Consider the Loaf Type: Different breads require slightly different approaches. Very crusty sourdoughs benefit immensely from a sharp serrated knife. Softer sandwich loaves can be sliced with less pressure but are prone to squishing if not handled carefully.
- Slice Just Before Serving: Bread is often at its best when freshly sliced. If you need to slice it ahead of time, store the slices properly (see storage tips below) to maintain freshness and prevent staleness.
- Practice Makes Perfect: Don’t get discouraged if your first few slices aren’t magazine-worthy. The more you practice, the more intuitive the motion will become. Celebrate each clean slice you achieve!
- Clean Your Knife: After slicing, wipe your knife clean. Bread crumbs can stick to the serrations and make subsequent slices less clean.
Knife Types for Bread: A Quick Comparison
While a serrated bread knife is ideal, it’s helpful to know what other knives do and why they might not be the best choice for slicing bread without squishing.
| Knife Type | Blade Description | Best For | Bread Slicing Suitability |
|---|---|---|---|
| Serrated Bread Knife | Long blade with saw-like teeth | Crusty breads, tomatoes, cakes | Excellent! Designed for sawing through tough exteriors and soft interiors without crushing. |
| Chef’s Knife | Broad, straight or slightly curved blade | Chopping, slicing, mincing most foods | Fair. Can work for softer breads with a very sharp blade and careful technique, but the smooth edge can tear a soft crumb. |
| Utility Knife | Smaller than a chef’s knife, often with a plain or serrated edge | Smaller tasks, fruits, vegetables | Poor. Too small for most loaves, and a plain edge will likely tear. A serrated utility knife is better but still not ideal for large loaves. |
| Santoku Knife | Japanese-style knife, often with granton edges (dimples) | Slicing, dicing, mincing, often with a rocking motion | Poor. The smooth edge and different blade shape are not designed for sawing through crusty bread. It will likely squish. |
Frequently Asked Questions About Slicing Bread
Is it safe to slice bread with a serrated knife?
Yes, it is safe when proper precautions are taken. Always use a stable cutting board, keep your guiding fingers curled inward and away from the blade, and maintain a steady sawing motion. Never rush the process.
What if I don’t have a bread knife?
If you don’t have a dedicated bread knife, a very sharp chef’s knife can work in a pinch for softer breads. However, it’s much harder to get clean slices, and the risk of squishing increases. For crusty loaves, a serrated knife is highly recommended.
How should I store sliced bread to keep it fresh?
Store sliced bread in a bread box, a paper bag, or a plastic bag at room temperature for a day or two. For longer storage, freeze slices in a freezer-safe bag. Avoid refrigerating sliced bread, as it can make it stale faster.
Do I really need to wait for bread to cool before slicing?
It’s highly recommended! Slicing hot bread can cause the soft interior to collapse and appear gummy. Letting it cool allows the crumb structure to set, making it firmer and much easier to slice cleanly without squishing.
My crusty bread crumbles when I slice it. What am I doing wrong?
This usually happens if the knife isn’t sharp enough or if you’re trying to cut too quickly. Ensure you’re using a serrated bread knife and employing a gentle, back-and-forth sawing motion. Let the knife do the work, and don’t force it.
Is slicing homemade bread different from store-bought?
Homemade bread can sometimes be more delicate or have a very thin crust, making it more prone to squishing. The same principles apply: a sharp serrated knife, a gentle sawing motion, and proper cooling time are key. Treat your beautiful homemade loaf with care!
How do I clean bread crumbs from my serrated knife?
Bread crumbs can get stuck in the serrations. A soft brush (like a vegetable brush or even an old toothbrush) works well for dislodging them. Alternatively, you can gently rinse the knife under running water and then dry it thoroughly. For more stubborn crumbs, a toothpick can help.
Enjoy Your Beautifully Sliced Bread!
You’ve learned the secrets to slicing bread without that frustrating squish! By using the right tools, understanding the gentle sawing technique, and taking a moment to let your bread cool, you can achieve perfect slices every time. Remember that every loaf you slice is a chance to practice and refine your skill. Embrace the process, celebrate your progress, and enjoy the delicious rewards of your effort!