
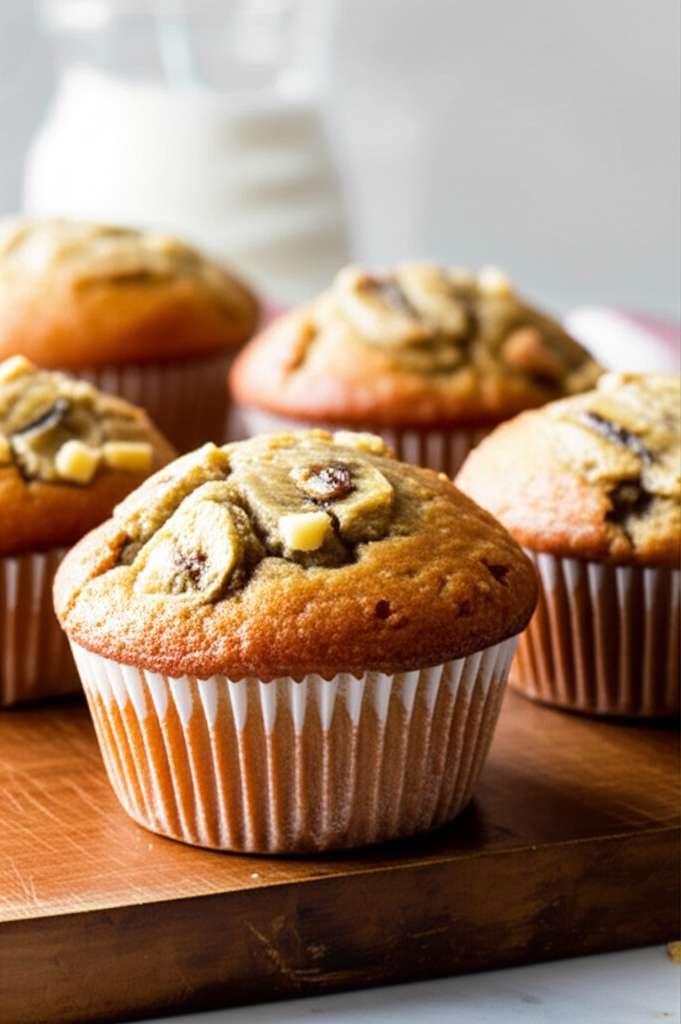
Need a delicious and easy breakfast? Banana muffins for breakfast are a perfect choice! They’re simple to make, incredibly tasty, and a wonderful way to start your day with homemade goodness that everyone will love.
Waking up to the aroma of freshly baked banana muffins is pure bliss. But for many beginners, the thought of baking can feel a little daunting. You might worry about overmixing, underbaking, or just getting the texture wrong.
Don’t let kitchen jitters hold you back! You absolutely can make amazing banana muffins. This guide is designed to walk you through every step, making it simple, fun, and totally stress-free. Get ready to fill your kitchen with a warm, sweet scent and enjoy a truly satisfying breakfast.
Why Banana Muffins Are Your New Breakfast Best Friend
Banana muffins are more than just a treat; they’re a breakfast powerhouse. They’re incredibly versatile, forgiving for beginners, and a fantastic way to use up those overripe bananas that are just begging for a purpose.
Their moist, tender crumb and naturally sweet flavor make them an instant hit. Plus, they’re perfect for busy mornings. You can bake a batch on the weekend and have healthy, delicious breakfasts ready to grab all week long. It’s the ultimate win-win for taste and convenience!
Gathering Your Banana Muffin Essentials
Before we dive into the mixing, let’s make sure you have everything you need. Cooking is always easier when you’re prepared, and having your ingredients and tools ready means a smoother baking experience.
Essential Ingredients
These are the building blocks for your delicious banana muffins. Don’t worry if you don’t have everything perfectly measured out yet; we’ll cover that in the preparation steps.
- Very Ripe Bananas: The riper, the sweeter and more flavorful your muffins will be! Look for bananas with lots of brown spots.
- Flour: All-purpose flour is perfect for these muffins.
- Sugar: Granulated sugar adds sweetness and helps create that lovely golden-brown crust.
- Eggs: They bind the ingredients together and add richness.
- Butter or Oil: Melted butter adds a wonderful flavor, while oil keeps muffins extra moist.
- Leavening Agent: Baking soda (and sometimes baking powder) helps your muffins rise and become fluffy.
- Salt: A pinch of salt balances the sweetness and enhances flavors.
- Vanilla Extract: For that classic warm, comforting flavor.
- Optional Add-ins: Chocolate chips, chopped nuts (like walnuts or pecans), or a sprinkle of cinnamon can take your muffins to the next level!
Must-Have Tools
You don’t need fancy gadgets to make great muffins. These are the basics that will get the job done:
- Muffin Tin: A standard 12-cup muffin tin is ideal.
- Muffin Liners: Paper liners make cleanup a breeze and prevent sticking.
- Mixing Bowls: At least two – one large and one medium.
- Measuring Cups and Spoons: Essential for getting the ingredient ratios just right.
- Fork or Potato Masher: For mashing those ripe bananas.
- Whisk or Fork: To lightly beat the eggs.
- Spatula or Wooden Spoon: For gently mixing the batter.
- Oven Mitts: For safe handling of hot baking sheets and ovens.
- Wire Rack: For cooling your perfectly baked muffins.
Prepping Your Ingredients: The Jonas Way
Preparation is key to stress-free baking. It means no frantic searching for ingredients or tools mid-recipe. Let’s get everything ready!
Step 1: Preheat Your Oven and Prep the Tin
First things first, turn on your oven. A properly preheated oven ensures even baking. Aim for 375°F (190°C). This temperature is great for muffins because it helps them rise nicely without burning.
While the oven heats up, get your muffin tin ready. Line each cup with a paper muffin liner. If you don’t have liners, you can grease the cups well with butter or cooking spray, and a little flour dusted in them works wonders to prevent sticking. This step is simple but super important!
Step 2: Mash Those Bananas
Take your very ripe bananas and place them in a medium-sized bowl. Use a fork or a potato masher to mash them until they are mostly smooth. A few small lumps are perfectly fine and add character to your muffins!
Don’t over-mash them into a liquid. You want a nice, chunky-smooth consistency. This is where a lot of that amazing banana flavor comes from, so don’t skip this step. Overripe is truly best here!
Step 3: Mix the Wet Ingredients
In your large mixing bowl, add your mashed bananas, melted butter (or oil), eggs, and vanilla extract. Give it a good whisk or stir with a fork until everything is well combined. You want a smooth, uniform mixture.
This is where the magic starts to happen! It’s already smelling wonderful, isn’t it? If you’re adding any liquid sweetener like maple syrup or honey, this is also the time to stir it in.
Step 4: Combine the Dry Ingredients
In a separate bowl (or even a large measuring cup), whisk together your flour, sugar, baking soda, and salt. If your recipe calls for baking powder or any spices like cinnamon, add them here too. Whisking these dry ingredients ensures that the leavening agents and salt are evenly distributed, which means your muffins will rise evenly and taste perfectly balanced.
This step is crucial. If you don’t mix the dry ingredients well, you might end up with pockets of baking soda or salt in your muffins, which isn’t ideal for taste or texture.
Bringing It All Together: The Batter Magic
Now comes the fun part – combining the wet and dry ingredients to create your muffin batter. The key here is to mix gently. Overmixing is one of the most common reasons for tough muffins, and we want tender, delightful ones!
Step 5: Gently Combine Wet and Dry
Pour the dry ingredients into the bowl with the wet ingredients and mashed bananas. Using your spatula or wooden spoon, gently fold them together. Mix only until you no longer see streaks of dry flour.
It’s totally okay if there are a few small lumps. Seriously, the less you mix, the more tender your muffins will be. Stop mixing as soon as it’s just combined. Overworking the batter develops gluten too much, leading to chewy, dense muffins instead of light and fluffy ones.
Step 6: Add Your Mix-Ins (Optional)
If you’re adding chocolate chips, chopped nuts, or anything else, gently fold them into the batter now. Again, use your spatula and fold just until they are distributed. You don’t want to overmix the batter at this stage either.
This is your chance to personalize your muffins! Chocolate chip banana muffins are a classic for a reason. Or maybe some crunchy walnuts for texture? Go for it!
Filling the Muffin Cups
Now it’s time to spoon your delicious batter into the prepared muffin tin. This step is straightforward but getting the right amount in each cup ensures consistent baking.
Step 7: Fill the Muffin Cups
Using an ice cream scoop or two large spoons, divide the batter evenly among the 12 muffin cups. Fill each cup about two-thirds to three-quarters full. Don’t overfill them, or they might overflow as they bake, despite your best efforts!
Filling them evenly is also important so that all your muffins bake at the same rate. If some are packed fuller than others, they won’t be done at the same time. Aim for consistency!
Baking Your Perfect Banana Muffins
The oven is preheated, the batter is ready – it’s time for them to transform into glorious muffins. Baking time can vary slightly, so keep an eye on them.
Step 8: Bake Until Golden
Carefully place the muffin tin into your preheated oven. Bake for 18-22 minutes, or until a toothpick inserted into the center of a muffin comes out clean. The tops should be golden brown and slightly springy to the touch.
If your oven tends to bake unevenly, you might want to rotate the muffin tin halfway through baking (around the 10-12 minute mark). This helps ensure all your muffins get beautifully golden and cooked through.
Step 9: Cool and Enjoy!
Once baked, carefully remove the muffin tin from the oven using your oven mitts. Let the muffins cool in the tin for about 5-10 minutes. This allows them to set slightly, making them easier to remove.
After the initial cooling, gently transfer the muffins to a wire rack to cool completely. This prevents the bottoms from getting soggy. And then… the best part: enjoy your amazing, homemade banana muffins for breakfast!
Tips for Banana Muffin Success
Even with a simple recipe, a few extra tips can elevate your banana muffin game. These are Jonas-approved secrets to consistently delicious results.
- Banana Ripeness is Key: I can’t stress this enough – the spottier and browner your bananas, the better. They have more sugar and moisture.
- Don’t Overmix the Batter: This is the golden rule of muffins! Mix just until combined. Lumps in the batter are a good thing.
- Accurate Measuring: Spoon your flour into the measuring cup and level it off with a straight edge. Scooping directly from the bag compacts the flour, leading to dry muffins.
- Oven Temperature Matters: Use an oven thermometer if you suspect your oven isn’t accurate. A consistent temperature is vital for proper rising and baking. The U.S. Department of Commerce recommends using an oven thermometer to ensure accuracy.
- Flavor Boosters: A pinch of cinnamon or nutmeg in the dry ingredients adds a lovely warmth. A teaspoon of lemon zest can brighten the flavor.
- Storage: Store cooled muffins in an airtight container at room temperature for up to 3 days. For longer storage, they can be frozen for up to 3 months.
Understanding Muffin Texture: The Science
Ever wondered why some muffins are dense and others are airy? It often comes down to how the batter is mixed.
When you combine flour with liquid and mix, gluten strands begin to form. A little gluten is good for structure, but too much, developed by overmixing, makes muffins tough and chewy. Baking soda reacts with moisture and heat to produce carbon dioxide gas, which creates air pockets, making muffins rise and become fluffy. Gentle mixing ensures these pockets aren’t overworked out of existence.
Nutritional Spotlight: Banana Muffins for Breakfast
Banana muffins can be a wholesome part of a balanced breakfast. Bananas themselves are a great source of potassium and vitamin B6, offering natural sweetness and energy.
When made with whole wheat flour or with added nuts and seeds, they can provide fiber and healthy fats. Of course, like any baked good, moderation is key, and they’re best enjoyed as part of a varied diet. For a healthier twist, consider reducing the sugar slightly and adding a tablespoon of chia seeds or flaxseeds to the dry ingredients.
Variations to Try
Once you’ve mastered the basic banana muffin, why not get a little creative? Here are some fun variations you can try:
Chocolate Chip Banana Muffins
Fold in about 1 cup of chocolate chips (milk, semi-sweet, or dark) into the batter just before filling the muffin cups.
Nutty Banana Muffins
Add 1/2 cup of chopped walnuts or pecans to the batter along with the chocolate chips.
Cinnamon-Spice Banana Muffins
Add 1 teaspoon of ground cinnamon and a pinch of nutmeg or allspice to the dry ingredients.
Blueberry Banana Muffins
Gently fold in 1 cup of fresh or frozen blueberries. If using frozen, don’t thaw them first!
Banana Muffin Troubleshooting Guide
Even with the best intentions, sometimes things don’t go quite as planned. Here’s a little guide to help you solve common muffin mysteries:
| Problem | Possible Cause | Solution |
|---|---|---|
| Muffins are dense or tough | Overmixing the batter | Mix wet and dry ingredients until just combined. Lumps are okay! |
| Muffins sank in the middle | Oven temperature too low; Leavening agent old or inactive; Batter overmixed | Ensure oven is properly preheated; Test baking soda/powder for freshness; Mix gently. |
| Muffins overflowed | Cups overfilled | Fill muffin cups only 2/3 to 3/4 full. |
| Muffins are dry | Overbaked; Too much flour; Not enough moisture | Bake only until a toothpick comes out clean; Measure flour accurately (spoon and level); Ensure bananas are very ripe. |
| Muffins didn’t rise | Baking soda/powder is old or inactive; Oven not hot enough | Check expiration dates of leavening agents and test their freshness; Ensure oven preheated fully. |
Frequently Asked Questions About Banana Muffins
Got more questions? I’m here to help!
Q1: How can I make sure my bananas are ripe enough?
A1: Look for bananas that are mostly brown or black. They will be soft and smell very sweet. Even bananas with fully black peels are perfect for baking!
Q2: Can I use frozen bananas?
A2: Absolutely! Thaw frozen bananas completely in a bowl, then drain off any excess liquid before mashing and using them in the recipe.
Q3: What if I don’t have muffin liners?
A3: You can grease your muffin tin thoroughly with butter or cooking spray. For extra insurance against sticking, dust the greased cups with a little flour, then tap out any excess.
Q4: How do I know when my muffins are done?
A4: The easiest way is to gently insert a toothpick or a thin skewer into the center of a muffin. If it comes out clean with no wet batter clinging to it, they are ready.
Q5: My muffins look a bit pale on top, can I fix this?
A5: You can broil them for 1-2 minutes at the very end of baking, keeping a very close eye to prevent burning. Or, you can simply enjoy them as they are; the taste will be unaffected by the color.
Q6: Can I make these muffins healthier?
A6: Yes! Try substituting half of the all-purpose flour with whole wheat flour. You can also reduce the sugar by a quarter cup and rely more on the natural sweetness of the bananas.
Conclusion: Bake with Confidence!
There you have it! Making delicious banana muffins for breakfast is within your reach. Remember, baking is a journey, and every attempt is a step forward. The most important ingredients are patience and a willingness to try.
Whether you’re making them for a quiet morning breakfast, a quick snack, or to share with loved ones, homemade banana muffins bring a special kind of joy. So go ahead, mash those bananas, mix that batter gently, and fill your kitchen with that wonderful, comforting aroma. You’ve got this, and I can’t wait for you to enjoy your amazing start to the day!