Use lemon zest for amazing flavor in your cooking and baking! This guide shows you exactly how to safely and easily zest a lemon to unlock its bright, aromatic oils for delicious results.
Hey there, kitchen adventurers! Ever looked at a recipe calling for “lemon zest” and felt a little unsure? You’re not alone! For many new cooks, zesting a lemon can seem a bit tricky. Maybe you’ve worried about cutting too deep or not getting enough flavor. But don’t let it dim your cooking shine! In this guide, we’ll break down exactly how to zest a lemon with confidence. We’ll cover the best tools, simple steps, and easy tips to make sure you get that wonderful, zesty burst of flavor every time. Get ready to add a bright new dimension to your favorite dishes!
What is Lemon Zest and Why Use It?
Lemon zest is the colorful outer layer of a lemon’s peel. It’s where all the magic happens! This thin, bright yellow layer is packed with tiny oil glands. These oils are bursting with intense lemon flavor and aroma. When you zest a lemon, you’re releasing these fragrant oils into your food. This adds a vibrant, fresh taste that’s different from lemon juice. Juice is tart and acidic, but zest offers a sweeter, more floral, and deeply lemony note. It’s like the sunshine of the citrus world, bringing a lively brightness to everything it touches!
The Amazing Flavor Power of Lemon Zest
Why go through the little effort of zesting? Because the flavor impact is HUGE! Lemon zest can transform a dish from good to absolutely unforgettable. Think about it: a sprinkle of zest can lift a simple cake, add a zing to pasta, or brighten up grilled fish. It’s a secret weapon for home cooks looking to add complexity and freshness without adding many ingredients. It cuts through richness, balances sweetness, and adds a beautiful, fragrant aroma that hints at sunny Mediterranean gardens. Even a tiny amount can make a noticeable difference, making your creations taste more professional and vibrant.
Gathering Your Tools: What You Need for Zesting
To get started with lemon zest, you don’t need a lot of fancy equipment. Most kitchens already have what you need! Here are the essential items:
- Lemons: Choose fresh, firm lemons. Organic is often preferred if you’re zesting, as you’re using the peel. Wash them thoroughly under cool water.
- Zester or Microplane: This is your best friend for zesting. A Microplane grater is fantastic because it creates fine, fluffy zest without grating into the bitter white pith.
- Fine Grater: If you don’t have a Microplane, a box grater with its smallest holes can work.
- Peeler: A vegetable peeler can also be used to remove larger strips of zest, which can then be finely chopped.
- Cutting Board: A stable surface to work on.
- Small Bowl: To collect your lovely zest.
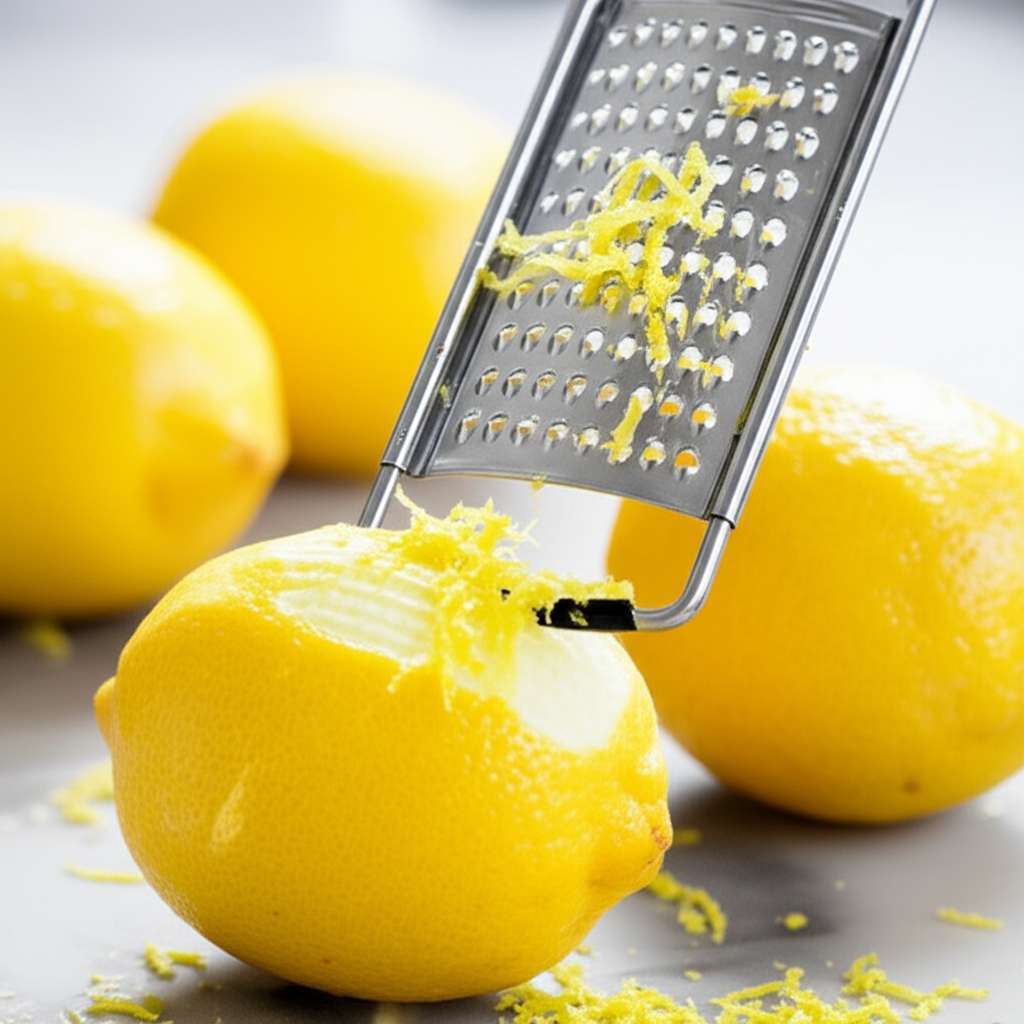
Step-by-Step Guide: How to Zest a Lemon
Let’s get zesting! Follow these simple steps for perfect lemon zest every time. Remember, we’re aiming for the yellow part, not the bitter white pith underneath.
- Wash Your Lemon: Start by washing your lemon really well under cool running water. You can even give it a gentle scrub with a clean vegetable brush to remove any surface dirt or residue. Since we’re using the peel, a good wash is super important.
- Choose Your Tool: Decide if you’re using a Microplane, a fine grater, or a peeler. For this guide, we’ll focus on the Microplane or fine grater, as they’re easiest for beginners to get just the zest.
- Grip the Lemon: Hold the lemon firmly in one hand. Make sure your fingers are tucked away safely from where the zesting tool will be. A firm, secure grip is key for control.
- Grip Your Zester: In your other hand, hold your zester or Microplane. Most zesters have a handle to hold onto comfortably. If using a box grater, rest it on the cutting board with the small holes facing up.
- The Zesting Motion: Gently but firmly, draw the zester down across the surface of the lemon. Imagine you’re trying to shave off just the very top layer. Move in one direction, applying even pressure. Don’t press too hard, or you’ll hit the bitter white pith!
- Rotate and Repeat: As you zest, turn the lemon slightly to expose a new section of peel. Continue this back-and-forth motion, zesting all around the lemon. You’ll see the beautiful yellow zest falling into your bowl or onto your cutting board.
- Stop Before the Pith: Pay attention to the color. Once you start seeing white, you’ve reached the pith. Stop zesting that area to avoid any bitterness. You can zest the remaining white parts if you like, but it won’t add much flavor.
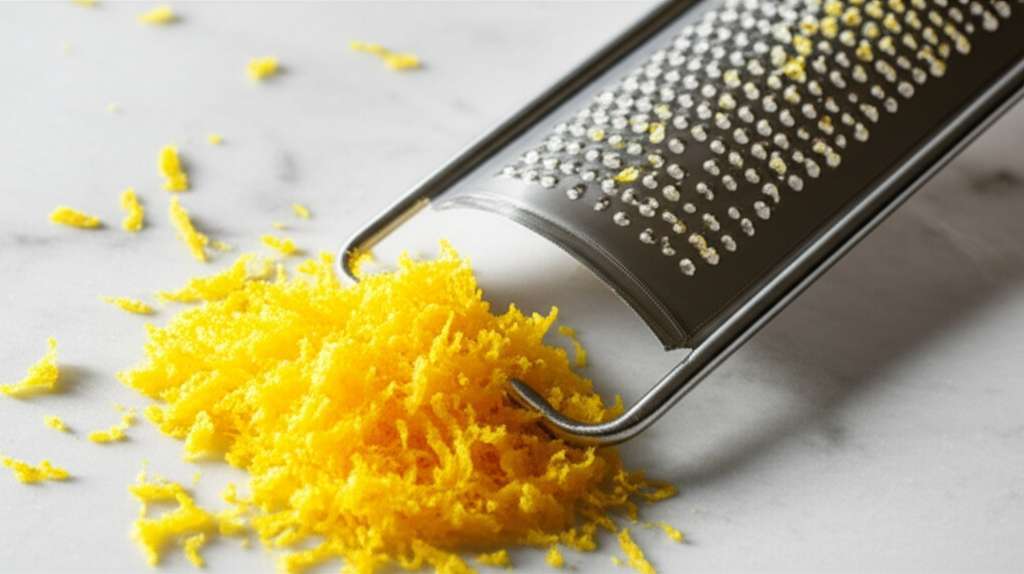
- Collect and Use: Gather all your lovely, fragrant zest. You can use it immediately in your recipe! If you have extra, store it in an airtight container in the refrigerator.
Common Beginner Zesting Mistakes (and How to Fix Them!)
It’s okay if your first few tries aren’t perfect! Here are some common hiccups and simple fixes:
- Mistake: Zesting too much white pith.Fix: This happens when you press too hard or go over the same spot too many times. Use a lighter touch and focus on just the yellow part. If you accidentally get some pith, you can try to pick out the larger white bits with your fingers or a small knife. For most recipes, a tiny bit of pith won’t hurt, but too much can make your dish taste bitter.
- Mistake: Not getting enough zest.Fix: You might be too gentle, or your tool might be dull. Apply a bit more consistent pressure, and make sure you’re using a sharp zester or Microplane. Zesting in a single, firm stroke often works better than lots of light passes.
- Mistake: Zesting with dull tools.Fix: A dull zester or grater can mangle the peel and make it harder to get just the zest. Invest in a good quality Microplane; they stay sharp for a long time and make zesting a breeze. If you’re using a box grater, make sure it’s not old and rusty.
Pro Tips for Zest-Worthy Results
Want to level up your zesting game? Try these handy tips:
- Zest Before Juicing: It’s much easier to zest a whole lemon than a half one. So, zest your lemons before you cut them in half to juice them.
- Choose the Right Lemons: Look for lemons with smooth, unblemished skin. Thicker-skinned lemons generally have more oil in their zest. Organic lemons are a great choice when you’re using the peel.
- Don’t Waste the Rest: After zesting, use the juiced lemon halves in recipes, for cleaning, or to make infused water. Nothing goes to waste!
- Freezing Zest: Have extra zest? You can freeze it! Spread it thinly on a baking sheet, freeze until solid, then transfer to an airtight container. It’s great for later use, though the aroma might be slightly less intense.
- Citrus Zest Variety: Don’t stop at lemons! Limes, oranges, and grapefruits all have wonderfully fragrant zests that can add amazing flavor to both sweet and savory dishes.
- Use Freshly Zested: For the most vibrant flavor and aroma, always try to use freshly zested citrus. The oils are most potent right after zesting.
Tool Comparison: Zesting Tools at a Glance
Choosing the right tool can make all the difference. Here’s a quick look at common zesting tools and what they’re best for:
| Tool | How it Works | Pros | Cons | Best For |
|---|---|---|---|---|
| Microplane Zester | Sharp, tiny holes create fine, fluffy zest. | Effortless, precise zest; minimal pith; easy to clean; ergonomic handle. | Can be pricier than other graters. | Beginners and experienced cooks; getting the finest zest. |
| Box Grater (Small Holes) | Uses small, sharp grater teeth. | Multi-functional tool; widely available. | Can be harder to control; more likely to grate pith; less ergonomic. | When a Microplane isn’t available; larger zest pieces. |
| Vegetable Peeler | Shaves off wider strips of peel. | Good for large strips of zest (for infusions or candied peel); easy to use. | Can’t get fine zest; often includes pith; requires chopping strips finely. | Making large strips for garnishes, infusions, or when you need to finely chop zest. |
Frequently Asked Questions About Lemon Zest
- What is the white part of the lemon peel called?
- The white part of the lemon peel is called the pith. It can be bitter, so most recipes call for just the colorful outer layer, known as the zest.
- How much zest do I get from one lemon?
- Typically, one medium-sized lemon yields about 1 to 2 tablespoons of zest. This can vary depending on the size and thickness of the lemon’s peel.
- Can I use lemon zest if I don’t have a zester?
- Yes! You can use the small holes on a box grater or a vegetable peeler followed by finely chopping the peel. Just be extra careful to avoid the bitter white pith when using these tools.
- Is it safe to eat lemon zest?
- Absolutely! Lemon zest is perfectly safe to eat and is a wonderful ingredient for adding flavor. Just make sure to wash your lemon thoroughly before zesting.
- How should I store leftover lemon zest?
- Store fresh zest in an airtight container in the refrigerator for up to a week. For longer storage, you can freeze it spread thinly on a baking sheet until solid, then transfer to a freezer-safe container.
- What’s the difference between lemon zest and lemon oil?
- Lemon zest is the physical peel containing the flavorful oils. Lemon oil is a concentrated extract of these oils, often used in commercial products or by professional bakers for a very intense lemon flavor.
- Can I use dried lemon zest?
- You can, but dried lemon zest has a much less intense flavor and aroma compared to fresh zest. It’s often used in spice blends. For the brightest, freshest flavor, always opt for fresh zest when possible.
Embrace the Zest!
See? Using lemon zest for amazing flavor is totally within your reach! You’ve learned what zest is, why it’s so wonderful, and how to get it safely and easily with simple tools. Remember, every time you practice, you’ll get a little more comfortable and a little more confident. Don’t be afraid to experiment – a little zest can go a long way in brightening up your everyday meals. Keep practicing, keep cooking, and enjoy the delicious journey!