Make amazing flavor with this easy Meat Church chili recipe! Learn simple steps for a rich, hearty chili perfect for beginners, packed with delicious, savory goodness.
Chili can sometimes feel like a culinary puzzle, especially when you’re just starting out. You might wonder about the right blend of spices, how to get that perfect, slow-cooked flavor, or even just what makes one chili recipe stand out from another. It’s completely normal to feel a bit unsure when you’re aiming for that deep, satisfying taste everyone loves.
But don’t worry, I’m here to help! We’re going to break down this fantastic Meat Church chili recipe step-by-step. You’ll learn exactly what goes into it, why each ingredient is important, and how to put it all together to create a chili that’s bursting with amazing flavor. Get ready to impress yourself and anyone you share it with!
Why Meat Church Chili is a Winner
The Meat Church chili recipe has gained quite a reputation, and for good reason. It’s designed to deliver incredible depth of flavor without being overly complicated. This recipe focuses on quality ingredients and simple techniques that build layers of taste, making it perfect for anyone looking to master a crowd-pleasing dish.
What makes it special is the thoughtful combination of spices and the way it encourages you to let the flavors meld together. It’s not just about throwing ingredients in a pot; it’s about creating a rich, savory experience that warms you from the inside out. This recipe is a fantastic way to build your confidence in making hearty, flavorful meals.

Gather Your Ingredients: The Heart of the Chili
Having all your ingredients ready before you start cooking is a game-changer. It makes the whole process smoother and more enjoyable. For this Meat Church chili, we’re focusing on building a robust flavor profile with classic chili components.
Think of these as your building blocks for an amazing chili. Each one plays a role in creating that signature taste and texture. Let’s get everything laid out so you’re ready to go!
The Essential Ingredients List
- 2 pounds ground beef (80/20 or 85/15 works great for flavor)
- 1 large yellow onion, chopped
- 2 bell peppers (any color), chopped
- 4 cloves garlic, minced
- 1 (28 ounce) can crushed tomatoes
- 1 (15 ounce) can diced tomatoes
- 1 (15 ounce) can kidney beans, rinsed and drained
- 1 (15 ounce) can pinto beans, rinsed and drained
- 1 (4 ounce) can mild green chilies, undrained
- 2-4 tablespoons chili powder (adjust to your spice preference)
- 1 tablespoon ground cumin
- 1 teaspoon smoked paprika
- 1/2 teaspoon dried oregano
- 1/4 teaspoon cayenne pepper (optional, for a little heat)
- Salt and freshly ground black pepper to taste
- 1-2 cups beef broth (or water), as needed
- Optional Toppings: Shredded cheese, sour cream, chopped onions, cilantro, tortilla chips
Having these items on hand means you’re halfway to a delicious meal. Don’t be intimidated by the list; we’ll go through how to use each one!
Tools You’ll Need
You don’t need a professional kitchen to make amazing chili. A few common tools are all it takes to get this recipe from your pantry to your plate. Having the right equipment makes cooking easier and safer.
Let’s make sure you have these basics ready to go. They’ll help you chop, stir, and simmer your way to chili perfection.

Your Chili-Making Toolkit
- Large pot or Dutch oven (at least 5-6 quart capacity)
- Cutting board
- Sharp knife
- Measuring spoons and cups
- Wooden spoon or heat-resistant spatula
- Can opener
- Colander (for rinsing beans)
See? Nothing too fancy! These are likely items you already have in your kitchen. With these in hand, you’re fully prepared to tackle this recipe.
Step-by-Step Guide to Amazing Chili Flavor
Now for the fun part: bringing all those ingredients together! We’ll go through each step slowly, explaining why we do what we do. This process is all about building flavor, so take your time and enjoy the aromas.
Follow along, and you’ll see how simple it is to create a truly delicious chili that tastes like it’s been simmering for hours.
Step 1: Brown the Ground Beef
Start by placing your large pot or Dutch oven over medium-high heat. Add the ground beef to the hot pot. Break it up with your spoon as it cooks.
You want to cook the beef until it’s nicely browned and no pink remains. This step is crucial for developing a rich, savory base for your chili. Once browned, carefully drain off any excess grease from the pot.
Step 2: Sauté the Aromatics
Add the chopped onion and bell peppers to the pot with the browned beef. Stir everything together and cook for about 5-7 minutes, or until the vegetables begin to soften.
Next, add the minced garlic. Stir it in and cook for another minute until fragrant. Be careful not to burn the garlic, as it can turn bitter.
Step 3: Introduce the Spices
Now it’s time to add the flavor powerhouses! Sprinkle in the chili powder, cumin, smoked paprika, oregano, and cayenne pepper (if using) over the meat and vegetable mixture.
Stir well to coat everything evenly. Let the spices toast in the pot for about 1 minute. This helps to release their full aroma and flavor, making your chili even more delicious.
Step 4: Add the Tomatoes and Chilies
Pour in the crushed tomatoes, diced tomatoes, and the can of undrained green chilies. Stir everything together, scraping up any browned bits from the bottom of the pot. These bits are packed with flavor!
The tomatoes will form the liquid base for your chili, and the green chilies add a subtle, pleasant heat and flavor.
Step 5: Incorporate the Beans
Add the rinsed and drained kidney beans and pinto beans to the pot. Stir them into the chili mixture.
Using two different types of beans adds both texture and visual appeal to your chili. They’ll absorb all the wonderful flavors as it simmers.
Step 6: Simmer and Meld Flavors
Bring the chili to a gentle simmer. Once it’s simmering, reduce the heat to low, cover the pot, and let it cook for at least 1 hour. Stir occasionally to prevent sticking.
This low and slow simmering is where the magic happens. It allows all the flavors to meld together, creating a deep, complex taste. If the chili becomes too thick, you can add a little beef broth or water, about 1/2 cup at a time, until it reaches your desired consistency.
Step 7: Season and Serve
After simmering, taste the chili and season with salt and freshly ground black pepper as needed. This is your chance to adjust the flavor to your liking. You might find it needs a little more salt, or perhaps a touch more chili powder.
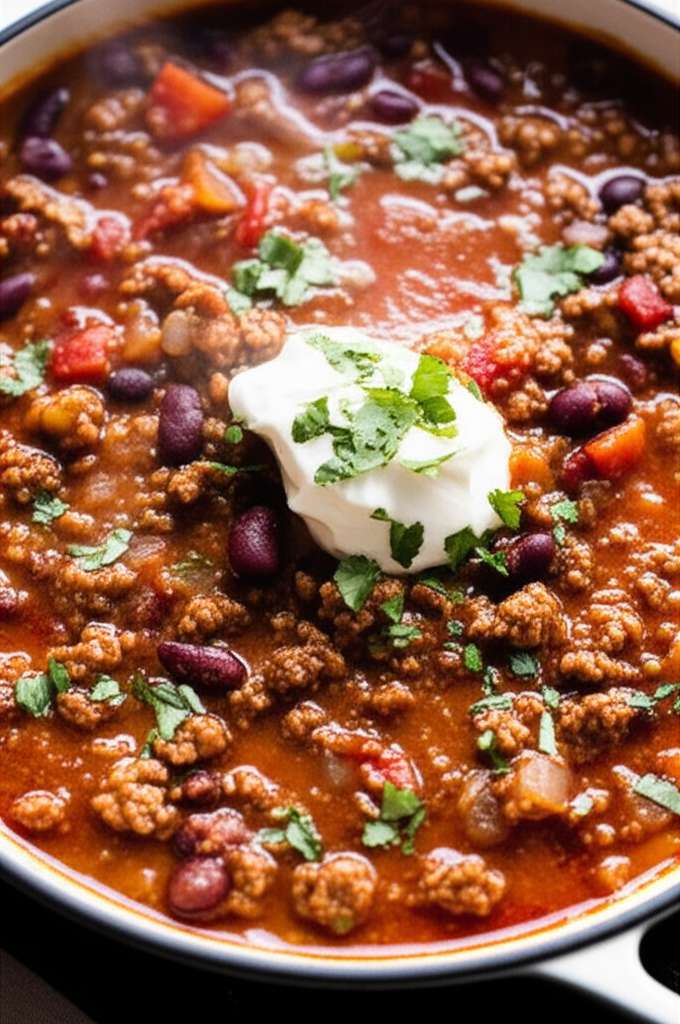
Ladle the hot chili into bowls. Garnish with your favorite toppings like shredded cheese, a dollop of sour cream, fresh chopped onions, or a sprinkle of cilantro. Enjoy your amazing, homemade chili!
Tips for Perfect Chili Every Time
Even with a great recipe, a few extra tips can elevate your chili-making skills. These are small adjustments that can make a big difference in the final taste and texture of your dish.
Think of these as your secret weapons for consistently delicious chili. They address common issues and offer ways to customize the recipe to your exact preferences.
Achieving Deeper Flavor
- Let it Rest: Chili often tastes even better the next day! The flavors have more time to meld and deepen. If you have the time, make it a day ahead.
- Spice it Up (or Down): Don’t be afraid to adjust the chili powder and cayenne pepper. Start with the recommended amounts and taste as you go. You can always add more heat, but you can’t take it away!
- Umami Boost: For an extra layer of savory flavor, consider adding a tablespoon of Worcestershire sauce or a small amount of unsweetened cocoa powder along with the spices.
Bean Choices and Preparation
While kidney and pinto beans are classic, feel free to experiment! Black beans are another excellent choice for chili. Always remember to thoroughly rinse and drain canned beans to remove excess sodium and that “canned” taste.
If you prefer to cook beans from dry, ensure they are fully cooked before adding them to the chili. This can add a slightly different texture and is a more economical option if you have the time.
Thickening Your Chili
If your chili is too thin, you can thicken it in a few ways. Simmer it uncovered for a bit longer to allow some of the liquid to evaporate. Alternatively, you can mash some of the beans against the side of the pot with your spoon to release their starch, which will naturally thicken the chili.
Another option is to create a slurry by mixing a tablespoon of cornstarch or flour with two tablespoons of cold water, then stirring this mixture into the simmering chili. Cook for a few minutes until thickened.
Ingredient Substitutions and Variations
One of the best things about chili is how adaptable it is. You can easily swap ingredients or add new ones to suit your taste, dietary needs, or what you have on hand. This flexibility is what makes homemade cooking so rewarding.
Let’s look at some common substitutions and fun variations that can make this Meat Church chili recipe your own.
Meat Options
Ground beef is traditional, but you can easily switch it up. Ground turkey or chicken can be used for a leaner option. For a richer flavor, try ground bison or a mix of ground beef and pork sausage.
Vegetarians and vegans can omit the meat entirely and add more beans, lentils, or even plant-based ground crumbles. Just be sure to use vegetable broth instead of beef broth.
Bean Varieties
As mentioned, black beans are a fantastic addition. You could also use cannellini beans, great northern beans, or even chickpeas. If using dried beans, remember they need to be cooked separately until tender before being added to the chili.
For a different texture, consider adding a can of corn, either whole kernel or creamed, during the last 30 minutes of simmering.
Spice Level Adjustments
The heat in chili comes primarily from chili powder and cayenne pepper. For a milder chili, reduce or omit the cayenne pepper and use a mild chili powder. For a spicier kick, increase the cayenne or add a pinch of red pepper flakes.
You can also add a jalapeño pepper (seeds removed for less heat, left in for more) along with the onions and peppers. For a smoky heat, consider adding chipotle peppers in adobo sauce – start with just one, finely chopped.
Liquid Base Alternatives
While beef broth is recommended for its flavor, chicken broth or vegetable broth can also be used. For a richer, deeper flavor, some people like to add a splash of beer (like a lager or amber ale) during the simmering stage.
A bit of tomato paste, sautéed with the onions and garlic, can also intensify the tomato flavor and add a touch of richness.
A Note on Food Safety
When cooking with ground meat, ensuring it’s cooked to a safe internal temperature is essential. For ground beef, this is typically 160°F (71°C). While we brown the meat visually, using a food thermometer is the most reliable way to confirm it’s safe to eat. For more detailed information on safe cooking temperatures for various meats, the USDA offers comprehensive guidelines.
Proper cooling and storage of leftovers are also crucial. Chili should be refrigerated within two hours of cooking. Leftovers can be stored in an airtight container in the refrigerator for 3-4 days. When reheating, ensure the chili is heated thoroughly until steaming hot.
Frequently Asked Questions About Meat Church Chili
It’s common to have questions when you’re trying a new recipe, especially one with so much potential for flavor. Here are some common queries that beginners often have about making chili.
Let’s clear up any lingering doubts so you can feel totally confident in making this recipe.
Q1: My chili seems a bit bland. How can I boost the flavor?
If your chili is tasting a little flat, don’t worry! The most common reason is not enough seasoning or not allowing enough simmering time for flavors to meld. Try adding a bit more salt, chili powder, or cumin. A splash of Worcestershire sauce or a teaspoon of soy sauce can also add a savory depth. Most importantly, give it more time to simmer on low heat.
Q2: Can I make this chili ahead of time?
Absolutely! Chili is one of those dishes that often tastes even better the next day. The flavors have more time to meld and deepen overnight. Make it a day in advance and reheat it gently on the stovetop or in the microwave.
Q3: How do I prevent my chili from sticking to the bottom of the pot?
Stirring is key! Make sure to stir your chili every 15-20 minutes, especially during the simmering phase. If you notice bits sticking, gently scrape them up with your spoon, as these bits are packed with flavor. If it’s consistently sticking, your heat might be too high, or the pot might be too thin.
Q4: What’s the best way to store leftover chili?
Store your leftover chili in an airtight container in the refrigerator. It will stay fresh for about 3-4 days. For longer storage, you can freeze portions of chili in freezer-safe containers or bags for up to 3 months. Thaw overnight in the refrigerator before reheating.
Q5: Can I use fresh chili peppers instead of canned?
Yes, you can! If you’re using fresh jalapeños or other chili peppers, finely chop them and sauté them with the onions and bell peppers in Step 2. Remember to remove the seeds and membranes for milder heat. The amount you use will depend on the size and type of pepper, and your desired spice level.
Q6: My chili is too watery. How can I thicken it?
There are a few ways to thicken chili. You can simmer it uncovered for a longer period to let some liquid evaporate. Another trick is to mash some of the beans against the side of the pot with your spoon; their starch will help thicken the chili. For a quicker fix, you can make a cornstarch slurry (1 tbsp cornstarch mixed with 2 tbsp cold water) and stir it in, simmering until thickened.
Conclusion: Enjoy Your Delicious Homemade Chili!
And there you have it – a simple yet incredibly flavorful Meat Church chili recipe that’s perfect for any home cook. You’ve learned how to select your ingredients, use the right tools, and follow clear steps to build amazing layers of taste. Remember, cooking is a journey, and with each meal you make, you’re building more confidence and skill in the kitchen.
Don’t be afraid to tweak this recipe to your liking next time. Maybe you’ll add a different kind of bean, experiment with more spices, or even try a different meat. The joy of cooking is in the discovery and the delicious results. So go ahead, enjoy this comforting bowl of chili, and feel proud of the wonderful meal you’ve created!