Pancake Princess Black Bean Cake Recipe: Amazing Treat! Discover a surprisingly delicious, healthy, and easy black bean cake recipe perfect for a fun dessert or snack that’s sure to impress.
Welcome to CookCanvas! I’m Henry, your friendly guide to making delicious food without the fuss. Today, we’re diving into something truly special: the Pancake Princess Black Bean Cake. If you’ve ever thought healthy desserts had to be complicated or bland, this recipe is about to change your mind completely!
Many of us love a good cake, but finding one that’s both satisfying and wholesome can feel like a quest. The idea of using black beans in a cake might sound unusual, even a little daunting, but trust me, it’s a fantastic secret ingredient. It adds incredible moisture and a subtle richness you won’t believe.
Don’t worry if you’re new to baking or trying out new ingredients. I’m here to guide you through every single step. We’ll break down the process so you can feel confident and have fun creating this amazing treat.
Ready to discover how simple and delightful baking with black beans can be? Let’s get started by gathering everything we need.
What Makes This Black Bean Cake So Special?
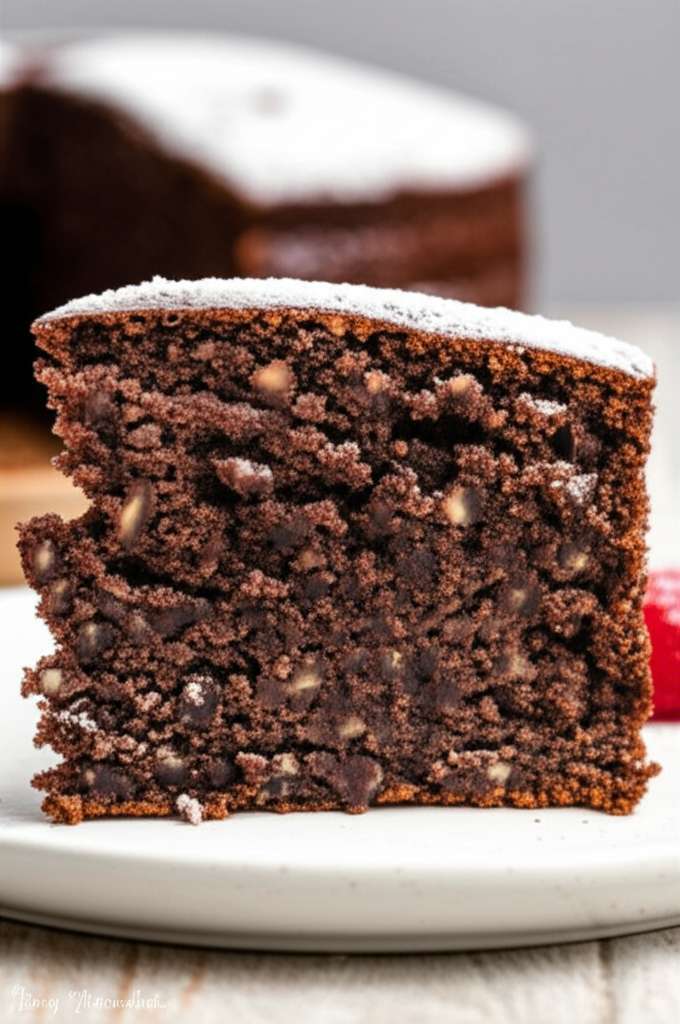
This Pancake Princess Black Bean Cake is a delightful surprise! It’s a moist, fudgy cake that cleverly uses black beans to create a wonderfully tender crumb and a boost of plant-based protein and fiber. It’s naturally gluten-free and can easily be made dairy-free, making it a versatile treat for many dietary needs.
The beauty of this recipe lies in its simplicity and the unexpected deliciousness. You won’t taste the beans, but you will absolutely taste the rich chocolatey goodness and appreciate the satisfying texture. It’s a perfect example of how simple, wholesome ingredients can create something truly decadent.
Gather Your Ingredients: The Building Blocks of Deliciousness
Having all your ingredients ready before you start makes baking so much smoother. Think of it like setting up your art canvas before you paint! For our Pancake Princess Black Bean Cake, here’s what you’ll need:

- 1 (15-ounce) can of black beans, rinsed and drained thoroughly
- 3 large eggs
- 1/2 cup unsweetened applesauce
- 1/4 cup melted coconut oil or your favorite neutral oil
- 1/2 cup maple syrup or honey (adjust to your sweetness preference)
- 1 teaspoon vanilla extract
- 1/2 cup unsweetened cocoa powder
- 1 teaspoon baking powder
- 1/2 teaspoon baking soda
- 1/4 teaspoon salt
- Optional: 1/2 cup chocolate chips (dark or semi-sweet)
- Optional: A pinch of cinnamon for warmth
Rinsing the black beans very well is key. This helps remove any residual liquid or “beany” flavor. We want them to be a neutral base for our cake!
Essential Tools for Your Baking Adventure
You don’t need a professional kitchen to make this cake. Just a few everyday tools will do the trick. Having these ready will make the process flow beautifully.
- Food processor or high-powered blender
- Large mixing bowl
- Whisk
- Spatula
- Measuring cups and spoons
- 8×8 inch baking pan or a round 9-inch cake pan
- Parchment paper (optional, but highly recommended for easy removal)
- Cooling rack
A food processor is ideal for getting that super smooth batter, but a good blender can also work wonders. If your blender has a smaller pitcher, you might need to blend the ingredients in batches.
Step-by-Step Guide: Crafting Your Black Bean Masterpiece
Let’s get baking! Follow these simple steps, and you’ll have an amazing cake in no time. Remember, baking is a process, and each step contributes to the final delicious outcome.
Step 1: Preheat Your Oven and Prepare Your Pan
First things first, let’s get our oven ready. Preheat it to 350°F (175°C). This ensures the cake bakes evenly from the moment it goes in.
Next, prepare your baking pan. If you’re using an 8×8 inch pan, lightly grease it and then line it with parchment paper, leaving some overhang on the sides. This makes lifting the cake out a breeze, preventing any sticking mishaps!
Step 2: Blend the Wet Ingredients (and the Beans!)
This is where the magic begins! In your food processor or blender, add the rinsed and drained black beans. Pulse them a few times until they start to break down.
Now, add the eggs, unsweetened applesauce, melted coconut oil, maple syrup (or honey), and vanilla extract to the food processor. Blend everything until the mixture is completely smooth and creamy. You shouldn’t see any large pieces of beans left.
A super smooth base is what we’re aiming for. This ensures the beans are perfectly incorporated and contribute to the cake’s incredible texture without being noticeable.
Step 3: Combine Dry Ingredients
In a large mixing bowl, whisk together the unsweetened cocoa powder, baking powder, baking soda, salt, and optional cinnamon. Whisking them together ensures that the leavening agents and cocoa are evenly distributed.
This step is important for a consistent rise and flavor throughout the cake. No one wants a bite that’s only cocoa or doesn’t rise properly!
Step 4: Mix Wet and Dry Ingredients
Pour the smooth black bean mixture from the food processor into the bowl with the dry ingredients. Using your spatula, gently fold the wet ingredients into the dry ingredients until just combined. Be careful not to overmix.
Overmixing can develop the gluten in any flours (though this recipe is flourless, it can still impact texture) and lead to a tougher cake. We want a tender crumb!
Step 5: Fold in Optional Add-ins
If you’re adding chocolate chips, now is the time! Gently fold them into the batter using your spatula. This is also a good point to add any other favorite mix-ins, like chopped nuts if you like.
The chocolate chips will melt slightly as the cake bakes, creating little pockets of gooey chocolatey goodness. Yum!
Step 6: Bake Your Cake
Pour the batter evenly into your prepared baking pan. Smooth the top with your spatula so it’s relatively flat. This helps ensure even baking.
Place the pan in your preheated oven. Bake for 25-35 minutes. The exact time will depend on your oven, so start checking around the 25-minute mark.
Step 7: Check for Doneness
How do you know when it’s ready? Insert a toothpick into the center of the cake. If it comes out clean, or with just a few moist crumbs attached (not wet batter), your cake is done!
If the toothpick comes out with wet batter, give it a few more minutes and check again. Ovens can vary, so this is always a good final check.
Step 8: Cool and Enjoy!
Once baked, carefully remove the cake from the oven. Let it cool in the pan for about 10-15 minutes. This allows the cake to set up a bit before you try to move it.
Then, using the parchment paper overhang, lift the cake out of the pan and place it on a wire cooling rack to cool completely. Patience here is rewarded with a cake that slices beautifully!
Tips for Success: Elevating Your Black Bean Cake
Even the simplest recipes can benefit from a few insider tips. Here are some to ensure your Pancake Princess Black Bean Cake is a resounding success every time!
- Bean Prep is Crucial: Don’t skip rinsing and draining the black beans. Patting them dry afterward can also help remove excess moisture.
- Smooth Operator: Blend the beans and wet ingredients until they are truly smooth. This is the secret to a cake texture where the beans are undetectable.
- Don’t Overmix: Mix the wet and dry ingredients until just combined. Overmixing can lead to a denser cake.
- Oven Temperature: Ensure your oven is accurately preheated. An oven thermometer can be a great tool for home bakers.
- Cooling Time: Allow the cake to cool sufficiently before slicing. This helps it firm up and prevents it from falling apart.
Ingredient Substitutions: Flexibility in the Kitchen
Sometimes you might be missing an ingredient or want to try a different flavor. Here are some common substitutions that work well for this recipe.
| Original Ingredient | Substitution Options | Notes |
|---|---|---|
| Black Beans | Kidney Beans, Pinto Beans | Rinse and drain very well. Ensure they are pureed completely smooth. |
| Eggs | Flax eggs (2 tbsp flaxseed meal + 6 tbsp water, let sit for 5 mins), Mashed banana (1/2 cup) | Flax eggs work best for binding. Mashed banana will add a banana flavor and may alter texture slightly. |
| Coconut Oil | Avocado Oil, Light Olive Oil, Melted Butter (if not dairy-free) | Use a neutral-flavored oil for best results. |
| Maple Syrup/Honey | Agave Nectar, Date Syrup | Adjust sweetness to your preference. These liquid sweeteners work well. |
| Applesauce | Pumpkin Puree, Mashed Sweet Potato | These will add a slight color and flavor change, but work well for moisture. |
When making substitutions, it’s always a good idea to start with just one or two changes at a time. This helps you understand how each change affects the final outcome. For more details on ingredient functions in baking, you can check out resources from culinary schools like The Culinary Institute of America.
Serving Suggestions: Making it Your Own
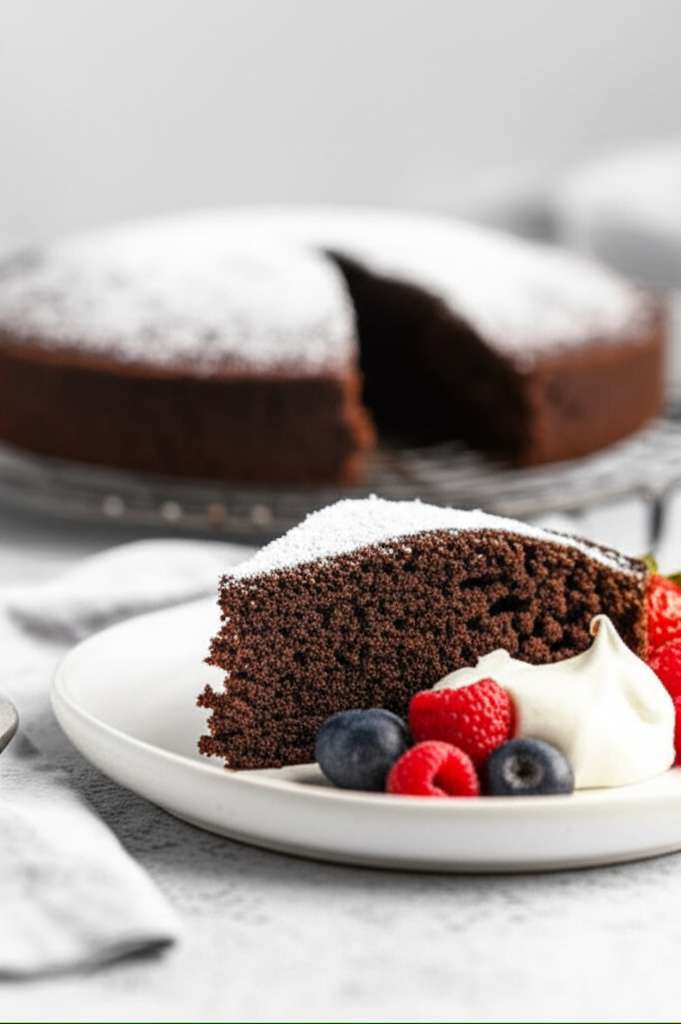
This black bean cake is delicious on its own, but a few toppings can take it to the next level. Here are some ideas:
- Fresh Berries: A handful of fresh raspberries, blueberries, or strawberries adds a bright, refreshing contrast.
- Whipped Cream or Coconut Cream: A dollop of light whipped cream or dairy-free coconut cream is a classic pairing.
- Dusting of Cocoa Powder: A simple dusting of extra cocoa powder can enhance the chocolate flavor.
- Chocolate Ganache: For an extra-decadent treat, drizzle with a simple homemade chocolate ganache.
- A Sprinkle of Powdered Sugar: For a touch of sweetness and elegance.
Think about what flavors you love! If you enjoy a little tang, lemon zest could be a delightful addition. If you’re a fan of spices, a touch of cardamom might be interesting.
Frequently Asked Questions (FAQ)
Baking can sometimes bring up questions, and that’s perfectly normal! Here are answers to some common queries about this Pancake Princess Black Bean Cake recipe.
- Q1: Will my cake taste like beans?
- A: Not at all! When black beans are blended thoroughly and combined with cocoa and sweetener, their flavor is completely masked. They contribute moisture and a fudgy texture, not a bean taste.
- Q2: Can I make this cake ahead of time?
- A: Yes! This cake stores very well. Once completely cooled, wrap it tightly in plastic wrap or store it in an airtight container at room temperature for up to 2 days, or in the refrigerator for up to 5 days. It also freezes beautifully!
- Q3: My batter seems too thick/thin. What should I do?
- A: Batter consistency can vary based on the moisture content of your beans and applesauce. If it seems too thick, add a tablespoon of water or milk (dairy or non-dairy) at a time until it reaches a thick but pourable consistency. If it seems too thin, you might have added too much liquid; try adding a tablespoon of cocoa powder or a bit more applesauce.
- Q4: Can I use a different type of flour?
- A: This recipe is designed to be flourless, relying on the beans and eggs for structure. If you wish to add flour, start with a small amount (like 1/4 cup) of gluten-free all-purpose flour or almond flour, but be aware it may change the texture and moisture level.
- Q5: How can I make this cake sugar-free?
- A: You can try substituting the maple syrup with a sugar-free liquid sweetener like erythritol-based syrup or stevia drops, but you may need to adjust the amount to achieve your desired sweetness. Be aware that sugar-free sweeteners can sometimes affect texture and moisture, so you might need further adjustments.
- Q6: My cake is dry. What might have happened?
- A: A dry cake can often be due to overbaking. Be sure to check the cake for doneness at the lower end of the baking time range and remove it as soon as a toothpick comes out with moist crumbs. Also, ensure you measured your dry ingredients accurately.
Conclusion: Your Kitchen Confidence Builder
And there you have it – the Pancake Princess Black Bean Cake recipe! You’ve just explored a creative and wholesome way to enjoy a delicious dessert. You’ve learned how simple ingredients can transform into something truly special, and gained confidence in trying new baking techniques.
This recipe is more than just a cake; it’s a testament to how versatile and forgiving baking can be. It’s a fantastic way to add more fiber and protein to your diet without sacrificing flavor or enjoyment. I encourage you to give it a try, and don’t be afraid to experiment with your favorite toppings!
Remember, every bake is a learning opportunity. Embrace the process, enjoy the delicious results, and keep that creativity flowing in your kitchen. Happy baking!