Perfect soft boiled eggs are achievable with this simple, foolproof method, ensuring a beautifully runny yolk every time. Say goodbye to watery whites or overcooked centers and hello to breakfast bliss!
Have you ever stared at a soft-boiled egg, wondering how to get that perfectly tender white and irresistibly gooey yolk?
It seems simple, but getting it just right can be a little tricky. Overcook them, and you’re left with a solid yolk. Undercook them, and the whites might shock you with their sliminess. But don’t worry, this guide is here to help!
We’ll walk through a super easy, step-by-step method that guarantees delicious, perfectly cooked soft-boiled eggs, every single time. Get ready to master your mornings!
Your Guide to the Perfect Soft Boiled Egg
Welcome to the wonderful world of soft-boiled eggs! They’re a delightful way to enjoy eggs, offering a tender white and a luscious, runny yolk that’s perfect for dipping toast soldiers or adding a creamy richness to any dish. Unlike their hard-boiled cousins, soft-boiled eggs require a bit more finesse to nail that delicate balance of textures and temperatures.
But guess what? It’s not complicated at all! With just a few simple steps and a bit of attention, you’ll be serving up perfect soft-boiled eggs like a pro. We’ll cover everything you need to know, from choosing your eggs to the precise cooking times. Let’s get cracking!

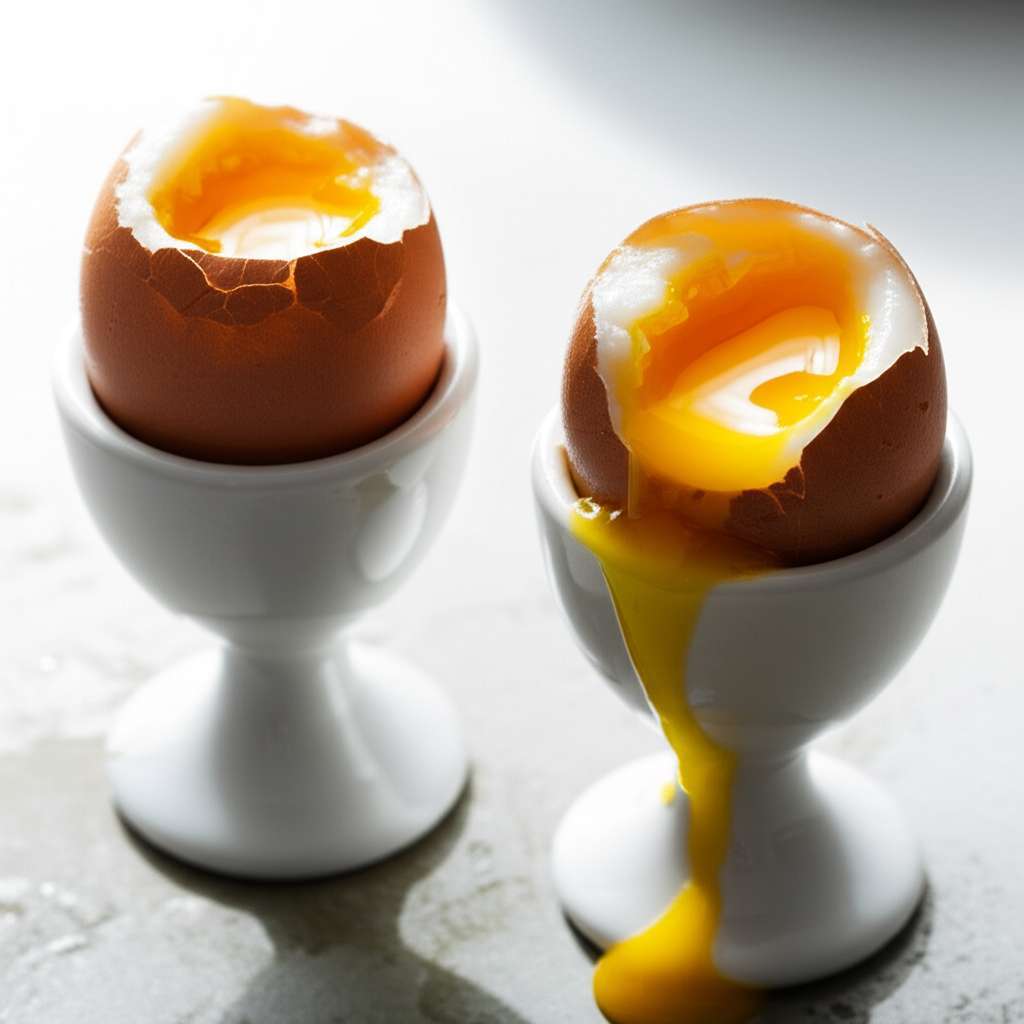
Why Soft Boiled Eggs? The Magic of the Yolk
So, what’s the big deal about soft-boiled eggs? It all comes down to that glorious, golden yolk. A perfectly soft-boiled egg has a white that is just set – tender and fully cooked, never rubbery. The star of the show, however, is the yolk, which remains liquid and creamy, bursting with flavor and a delightful silken texture.
This runny yolk is fantastic for so many things! It’s the classic pairing for “soldiers” – strips of toast perfect for dipping. Imagine dunking a piece of warm, crispy toast into that warm, flowing yolk. Pure bliss! It also adds an incredible richness when spooned over avocado toast, ramen, or even a simple salad.
Beyond the taste and texture, soft-boiled eggs are a nutritious powerhouse, packed with protein, vitamins, and minerals. They’re a wonderful way to start your day with sustained energy, offering a satisfying and flavorful breakfast that feels both wholesome and indulgent.
What You’ll Need: Simple Ingredients & Tools
The beauty of this soft-boiled egg recipe lies in its simplicity. You probably already have most of what you need in your kitchen!
Ingredients:
- Eggs: The fresher, the better! Aim for large eggs for consistent results. You can use eggs straight from the fridge or let them sit at room temperature for about 15-30 minutes if you have the time – this can help prevent cracking due to thermal shock, though it’s not strictly necessary for this method.
- Water: Enough to cover your eggs by at least an inch in the saucepan.
- Ice: For the ice bath – essential for stopping the cooking process precisely.
Essential Tools:
- Saucepan: A medium-sized saucepan that’s deep enough to fully submerge your eggs.
- Slotted Spoon or Spider Strainer: To gently lower the eggs into and lift them out of the boiling water without breaking them.
- Bowl: A medium-sized bowl for the ice bath.
- Timer: Crucial for accuracy! A kitchen timer or your phone’s timer will work perfectly.
The Foolproof Soft Boiled Egg Method: Step-by-Step
Let’s get this done! This method focuses on bringing the water to a boil before adding the eggs. This gives you more control over the cooking time and is generally very reliable for beginners.
Step 1: Prepare Your Ice Bath
Before you even think about boiling water, get your ice bath ready. Fill a medium-sized bowl with cold water and plenty of ice cubes. You want this ready to go immediately after the eggs are cooked. This shock of cold stops the cooking process dead in its tracks, preventing the yolk from further solidifying and ensuring that perfect runny center.
Step 2: Get the Water to a Rolling Boil
Place your saucepan on the stove over high heat. Add enough cold water so that it will cover your eggs by at least an inch. Bring the water to a full, rolling boil. This means you’ll see big bubbles coming up from the bottom of the pot consistently.
Step 3: Gently Lower the Eggs
Once the water is at a rolling boil, carefully reduce the heat slightly so the boil is vigorous but not violently splashing. Using your slotted spoon or spider strainer, gently lower each egg into the boiling water. Do this one at a time to avoid bumping them. Be extra gentle; you don’t want any cracks!
Step 4: Set Your Timer (The Crucial Part!)
This is where precision matters most. Once all the eggs are safely in the boiling water, start your timer immediately. The cooking times below are a guide, but they can vary slightly based on egg size, how cold they were initially, and your stove’s heat. For a classic soft-boiled experience with a liquid yolk and set white:
- For large eggs, aim for 6 to 7 minutes.
- 6 minutes: Very runny yolk, tender white.
- 7 minutes: Runnier yolk, fully set white.
We’ll dive deeper into timing variations in the next section. For now, trust your timer!
Step 5: Transfer to the Ice Bath
As soon as your timer goes off, immediately use your slotted spoon to carefully lift the eggs out of the boiling water. Plunge them directly into the prepared ice bath. Let them sit in the ice bath for at least 2 to 3 minutes. This is key to stopping the cooking and making them easy to handle.
Step 6: Peel and Enjoy!
Once chilled in the ice bath, you can peel your eggs. Gently crack the egg all over on a hard surface, then start peeling from the wider end. The shell should come off more easily now. If it’s tricky, a little nudge under running cool water can help. Serve immediately and enjoy that beautiful, runny yolk!
Timing is Everything: Perfecting Your Yolk Consistency
The cooking time is the secret sauce to achieving your desired yolk consistency. Every minute counts! This table provides a general guideline. Remember that these times are for large eggs and assume eggs are coming directly from the refrigerator.
| Cooking Time (in boiling water) | Yolk Consistency | White Consistency | Ideal For |
|---|---|---|---|
| 5 minutes | Very fluid, almost raw | Barely set, slightly unset in places | “Onsen” style (Japanese hot spring eggs) – not a true soft boil but a popular preparation |
| 6 minutes | Very runny, liquid | Softly set, tender | Maximum runny yolk, excellent for dipping |
| 7 minutes | Runny, but slightly thicker | Fully set, tender | Classic soft-boiled, still fluid yolk, more forgiving |
| 8 minutes | Beginning to thicken, jammy center | Firmly set | Transitioning to a medium-boiled egg |
| 9-10 minutes | Jammy, but mostly cooked through | Firmly set | Hard-boiled territory; yolk is no longer runny |
Important Note: Altitude can affect boiling times. At higher altitudes, water boils at a lower temperature, so you might need to increase your cooking time slightly. For regions above 3,000 feet, consider adding an extra minute to your cooking time.
If you prefer a runnier yolk, start on the lower end of the time range (6 minutes). If you like it a bit less liquid, but still wonderfully gooey, aim for 7 minutes. The ice bath is crucial, no matter the time, as it halts the cooking process instantly. This means even if you’re a few seconds over on the timer, the ice bath will save your yolk from becoming solid.
Variations to Try for Your Perfect Egg
While the boiling water method is incredibly reliable, there are other popular ways to achieve a perfect soft-boiled egg, each with its own nuances.
The Steaming Method: A Gentler Approach
Steaming is a fantastic alternative that can be even more forgiving than boiling. It uses less water and the gentle steam cooks the eggs delicately, reducing the chance of cracking.
How to do it:
- Pour about an inch of water into your saucepan and bring it to a boil.
- Place a steamer basket or a heatproof plate over the boiling water.
- Once steaming, carefully place your eggs in the steamer basket.
- Cover the pot and steam for precisely 6 to 7 minutes, depending on your desired yolk consistency.
- Immediately transfer to an ice bath as described above.
Steaming can sometimes result in slightly easier peeling, as the steam helps to loosen the membrane under the shell. It’s a wonderful technique for those who find boiling eggs a bit daunting.
The Cold Water Start Method: Simpler Prep
This method involves starting the eggs in cold water and bringing them up to a boil together. It’s simpler in terms of process, but requires careful timing once the boil is reached.
How to do it:
- Place your eggs in a saucepan.
- Cover them with cold water by about an inch.
- Place the saucepan over high heat and bring the water to a rolling boil.
- Once boiling, start your timer immediately. Typical times for a soft-boiled egg in this method are around 3 to 4 minutes after it reaches a rolling boil.
- Transfer to an ice bath.
The challenge with the cold water start is that it’s harder to predict exactly when the egg’s interior will reach the desired temperature, as the heating is less controlled. The boiling water method offers more control for beginners who want to ensure consistency.
Tips for Success: Avoiding Common Pitfalls
Even with a great recipe, a few common egg-cooking hiccups can occur. Here are some tips to help you avoid them and ensure success every time!
Preventing Cracked Eggs: Handle with Care!
Cracked eggs can make a mess and lead to watery whites. Here’s how to minimize the risk:
- Use Room Temperature Eggs: While not strictly mandatory, letting eggs sit out for 15-30 minutes can reduce the temperature difference when they hit the hot water, decreasing the chance of cracking.
- Gentle Lowering: Use a slotted spoon or spider strainer to carefully lower eggs into the water, one by one. Don’t drop them in from a height.
- Don’t Overcrowd the Pot: Too many eggs in a small pot can bump into each other and crack. Cook eggs in batches if necessary.
- Avoid Violent Boiling: Once the water is boiling, reduce the heat slightly so it’s a vigorous simmer, not a violent churn.
Peeling Made Easy: The Ice Bath is Your Friend
Peeling can be the most frustrating part. The ice bath is your best friend here!
- Rapid Cooling: The quick temperature change shrinks the egg slightly, pulling the membrane away from the shell.
- Tap Gently, Then Roll: Once cooled, gently tap the egg all over on a hard surface. Then, place it on the counter and roll it firmly under your palm to crack the shell all over.
- Start at the Wide End: The air pocket is usually at the wider end of the egg, making it a good starting point for peeling.
- Use Cold Water: If the shell is stubborn, peeling under a gentle stream of cool running water can help wash away small shell fragments.
Ensuring the Yolk Stays Runny
This is the ultimate goal, right?
- Accurate Timing: This is non-negotiable. Use a reliable timer and stick to the recommended times for your desired consistency.
- The Ice Bath is MANDATORY: Don’t skip this step! It stops the cooking process instantly.
- Freshness Matters: Fresher eggs tend to have a tighter white and more centered yolk, which can make peeling slightly harder but contributes to a better texture. Older eggs are often easier to peel but may have a runnier white.
By following these tips, you’ll be well on your way to mastering the soft-boiled egg!
Serving Suggestions: Beyond the Breakfast Plate
A soft-boiled egg is a delightful start to the day, but its creamy, decadent yolk makes it a versatile ingredient for many meals.
The Classic Breakfast
- Toast Soldiers: The quintessential pairing. Toast a slice of bread, cut it into strips, and serve alongside your perfectly soft-boiled egg. DIP!
- Avocado Toast: Place a halved soft-boiled egg on top of your favorite avocado toast. Spoon some of that glorious yolk over everything.
- With Bacon or Sausage: A hearty breakfast complete with your favorite breakfast meats.
Lunch & Dinner Enhancements
- Salad Topper: Add a soft-boiled egg to any green salad for an extra protein boost and a luxurious, creamy element. Think of something like a Cobb salad or a Niçoise salad.
- Ramen Booster: A half or whole soft-boiled egg (often marinated for ramen, called ‘Ajitsuke Tamago’) is an essential topping for a steaming bowl of ramen. The runny yolk mingles beautifully with the broth.
- Grain Bowls: Top your quinoa, farro, or rice bowls with a soft-boiled egg for a satisfying and flavorful meal.
- Gourmet Sandwiches: For an extra special treat, add a soft-boiled egg to a sandwich. The yolk can act as a natural sauce!
Don’t underestimate the power of a perfectly cooked soft-boiled egg to elevate a simple dish. Its rich yolk adds a professional touch and a wonderful depth of flavor that’s hard to beat. Want to explore the science behind egg cooking? Check out this informative article from The Culinary Institute of America on egg cookery for some fascinating insights into protein denaturation and how heat affects eggs: Culinary Institute of America: Egg Cookery Basics.
Frequently Asked Questions About Soft Boiled Eggs
Here are some common questions beginners have about making soft-boiled eggs:
Q1: Can I use eggs that aren’t fresh?
A: You can, but fresher eggs are generally better for soft-boiling as their whites are firmer and hold their shape better. Older eggs are often easier to peel, though.
Q2: What’s the best way to store soft-boiled eggs before peeling?
A: It’s best to peel and eat them immediately after cooling in the ice bath for the best texture. If you need to store them, they will continue to cook slightly, and the yolk will eventually solidify. For short-term storage (a few hours), keep them in the cooled water from the ice bath in the refrigerator.
Q3: My eggs cracked when boiling, what did I do wrong?
A: This usually happens due to a sudden temperature change (thermal shock) or overcrowding the pot, causing the eggs to bump into each other. Try letting your eggs come to room temperature for a bit before boiling, and lower them very gently into the water.
Q4: How do I know if my soft-boiled egg is safe to eat?
A: As long as eggs are cooked to the appropriate temperature and handled safely (like using an ice bath to stop cooking), soft-boiled eggs are safe. Always use fresh, reputable eggs and ensure the white is fully set. If you have concerns about food safety, you might prefer hard-boiled eggs.
Q5: Can I make soft-boiled eggs ahead of time?
A: Soft-boiled eggs are best enjoyed fresh when the yolk is perfectly runny. If you cook them ahead, the yolk will continue to cook and will likely become solid. For meal prepping, it’s better to hard-boil eggs or cook them just before serving.
Q6: Why is my soft-boiled egg yolk still hard?
A: This almost always comes down to overcooking. Ensure you are using an accurate timer and transferring the eggs to the ice bath immediately when the time is up. Even an extra minute can make a difference!
Q7: How long should I cook eggs if they are from the chiller vs. refrigerated?
A: If your eggs are already at room temperature, you might want to reduce the cooking time by about 3